If you haven’t done so already, please complete the previous tutorial, starting with How to create a 3D Roll a Ball game.
Items can now be picked up (disappeared), but the number in ItemsCountLabel (UI at the bottom left) does not change.
Here, we’ll create behavior that counts the remaining items and updates ItemsCountLabel.
Also, the game will be cleared when all items have been obtained.
The contents to be created are as follows:
- The number of child objects of the Items object is reflected in ItemsCountLabel.
- If the number of child objects becomes 0, WinnerLabel is displayed.
- Use Logic Behavior to create the behavior.
Add Logic Behavior to Main Logic
- Select the Main Logic object
- Click the Add Component button in the Inspector window
- Select Logic Toolkit/Logic Behavior from the Component menu
- Click the Edit button on the Logic Behavior component to open the Logic Editor window
Edit Logic Behavior in Main Logic
In the Logic Editor window, we will edit the Logic Behavior of the Main Logic.
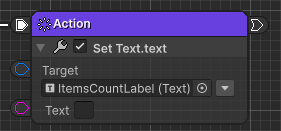
Create a Set Text.text node
- Drag and drop the execution port of the Start node to the right side (where you want to create the destination node) and open the node creation menu.
- Select the Members tab.
- Enter
UI.Text textin the search field. - Select
UnityEngine.UI.Texttext [Set] from the list. - Select Action from the node type selection menu.
- Confirm the node name with the
Enterkey.
The reason we use the legacy UI.Text instead of TextMesh Pro is simply to reduce assets and omit setup in the distributed package.
In projects that use TextMesh Pro, you can also call text[Set] in TMPro.TMP_Text in the same way.
Edit the Set Text.text node
- Drag and drop the Canvas/ItemsCountLabel object from the Hierarhcy window into the Target field.

Create a Get Trasfnrom.childCount node
- Drag and drop the Items object from the Hierarchy window to the left of the Set Text.text node (where you want to create the node) and open the node creation menu.
- Select the Members tab.
- Enter
Transform childCountin the search field. - Select
UnityEngine.TransformchildCount [Get] from the list. - Select Compute from the node type selection menu.
- Confirm the node name with the
Enterkey.
In this way, you can drag and drop an object onto the graph to select the related node.
After creating a node, it will be set as the object field, so there is no need to set it separately.
Use it as you like.
Connect the Get Trasfnrom.childCount node
- Drag and drop the output port of the Child Count field of the Get Transform.childCount node onto the input port of the Text field of Set Text.text.
When ports are connected, a small node is also inserted between them.
This is a Convert node that converts between different types.
Transform.childCount outputs an integer value of type int, but Text.text receives input of type string.
Normally, they cannot be connected directly because the types are different, so the int type numeric value must be converted to type string.
In the Logic Toolkit, if type conversion is required when connecting data ports, a Convert node will automatically be inserted.
Even data ports that require this kind of conversion can be connected smoothly.
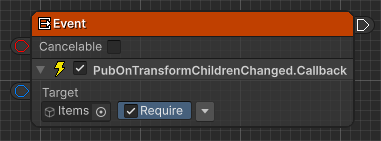
Creating a PubOnTransformChildrenChanged.Callback node
Receives events when child objects are changed.
- Press the
Spacekey below the Start node to open the node creation menu - Select the Members tab
- Enter
OnTransformChildrenChanged Callbackin the search field - Select
LogicToolkit.Builtin.Messages.PubOnTransformChildrenChangedCallback from the list - Select Event from the node type selection menu
- Confirm the node name with the
Enterkey
Editing the PubOnTransformChildrenChanged.Callback node
- Drag and drop the Items object into the Target field.

If you drag and drop an object that does not have a component added, it will enter a mode where the component is obtained from the specified GameObject.
Require will also be checked automatically, so if the component is not present when you play, it will be added and then executed.
Copy and paste the Set Text.text node
The update node for ItemsCountLabel has already been created, so we will simply copy and paste it to reuse it.
- Select the existing Set Text.text Action node
- Copy
- Windows:
Ctrl+C - Mac:
Cmd+C
- Windows:
- Move the mouse cursor to the right side of the PubOnTransformChildrenChanged.Callback node.
- Paste
- Windows:
Ctrl+V - Mac:
Cmd+V
- Windows:
When you paste, the connection state from the Get Transform.childCount node (specifically, the Convert node beyond that) will also be copied.
This time, let’s share it as is.
Connecting the PubOnTransformChildrenChanged.Callback node
- Connect the execution port of the PubOnTransformChildrenChanged.Callback node to the Action node of Set Text.text.
Some people might think, “If the settings are the same and the execution sources are different, I want to connect multiple nodes to the same Action node,” but unfortunately this is not possible.
Multiple Event nodes can be executed independently and simultaneously, so if running nodes are allowed to merge, the execution states will become mixed.
For example, if two Event nodes merge with a node that waits for five seconds, and that node is executed simultaneously, it will result in multiple executions.
And all transitions after the five-second wait will also be executed simultaneously.
Allowing this would cause many problems.
For this reason, the Logic Toolkit restricts the connections of execution ports so that they cannot merge.
Instead of merging, the same flow can be shared via Custom event or Function graph.
Adding an Int Equals node
From here, we will create the behavior that determines whether the game is cleared.
- Drag and drop the output port of the Child Count field of Get Transform.childCount to the bottom of the Set Text.text node on the PubOnTransformChildrenChanged side (where you want to create the destination node) and open the node creation menu.
- Select the Scripts tab.
- Enter
Int Equalsin the search field. - Select Int Equals (Compute) from the list.
- Confirm the node name with the
Enterkey.
For the purpose of video recording, the Get Transform.childCount node has been moved under PubOnTransformChildrenChanged.
The comparison value for the remaining items should be 0, so there is no need to edit it.
Creating a Branch Node
- Drag and drop the output port of the Result field of the Int Equals node to the right side of the Set Text.text node (where you want to create the destination node) and open the node creation menu.
- Select the Scripts tab.
- Select Flow Controls/Branch from the list.
Connecting the Branch node
- Connect the transition port of Set Text.text to the Branch node.
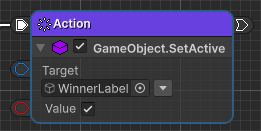
Creating a GameObject.SetActive node
- Drag and drop the True port of the Branch node to the right side (where you want to create the destination node) and open the node creation menu.
- Select the Members tab.
- Enter
GameObject SetActivein the search field. - Select
UnityEngine.GameObjectSetActive(bool value) from the list. - Select Action from the node type selection menu.
- Confirm the node name with the
Enterkey.
Editing the GameObject.SetActive node
- Drag and drop the Canvas/WinnerLabel object from the Hierarchy window into the Target field.
- Check the Value field.

Checking the operation of the Main Logic
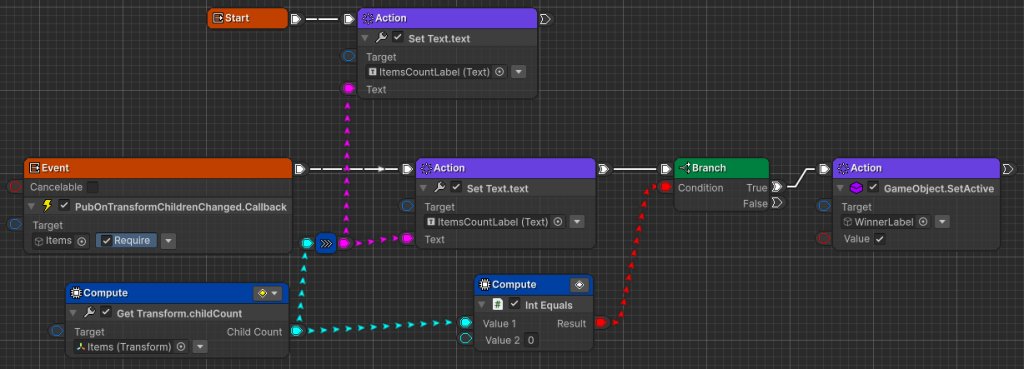
Once you’ve done this, your graph will look like this:

Start playing and check the behavior of Main Logic.
- When starting play, confirm that the number of items displayed in the bottom left corner is
6. - Scan the Player and touch the Item objects, and confirm that the number of items displayed decreases when an Item object is discarded.
- Confirm that when all Item objects are picked up,
YOU WIN!is displayed in the center of the screen.
Next time
Next time we will cover 5. Creating DangerWall Behavior.
Post completion
If you would like to post on social media about the completion of the work up to this point, click here.
