If you haven’t done so already, please complete the previous tutorial, starting with How to create a 3D Roll a Ball game.
The Player can now move, but it is very difficult to see because the Camera does not follow.
Let’s create behavior so that the Main Camera follows the Player.
The contents to be created are as follows:
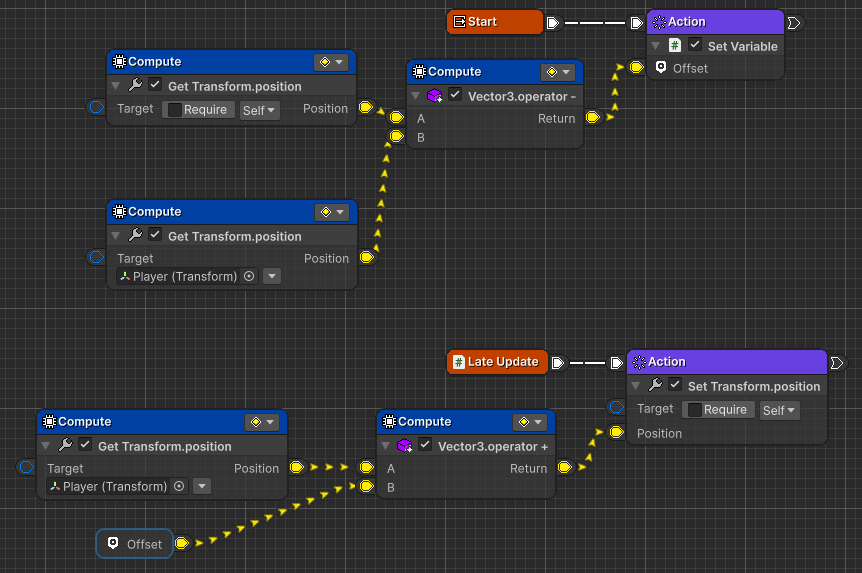
- First, the relative position Offset between the Player and Main Camera is stored, and each frame the Offset is added to the Player’s position, and the result is set to the Main Camera’s coordinates.
- At the start, the relative vector between the Player’s
Transform.positionand the Main Camera’sTransform.positionis calculated and set to the Offset variable. - In LateUpdate, the Main Camera’s
Transform.positionis set to the Player’sTransform.positionplus the Offset variable. - Use Logic Behavior to create the behavior.
Added Logic Behavior to Main Camera
- Select the Main Camera object
- Click the Add Component button in the Inspector window
- Select Logic Toolkit/Logic Behavior from the Component menu
- Click the Edit button in the Logic Behavior component to open the Logic Editor window
Edit Main Camera Logic Behavior
We will edit the Logic Behavior of the Main Camera in the Logic Editor window.
Creating an Offset Variable
Create a variable to store the relative position of the Player and Main Camera.
- Select the Blackboard tab in the side panel
- Select the Local tab
- Click the “+” button in the variable list
- Select Builtin/Vector3 from the variable type list
- Enter
Offsetas the name and confirm.
Blackboard is a function for storing various types of variables (a function for storing values and referencing them later).
The Local tab allows you to create variables that are not referenced by other graphs.
In this example, we are creating the variables in the Local tab since they will only be used within the graph.
The variable type Vector3 is a three-dimensional vector.
In other words, “we created an Offset variable to store a three-dimensional vector that will only be used within the graph.”
If you make a mistake with the name, you can rename it by right-clicking on the name field and selecting Rename, or by double-clicking on the name field.
Create a setting node for the offset variable
Create a node to set the Offset variable.
- Drag and drop the name of the Offset variable in the Blackboard tab of the side panel to the right side of the Start node on the graph (where you want to create the node) and open the node creation menu.
- Select Set Variable (Action) from the node creation menu.
- Enter the node name as is and press
Enter.
Connect the Start node and the Offset setting node
Connect the execution port to set the Offset value at the start.
- Connect the execution port of the Start node to the Set Variable node.
Vector3.operator – creating nodes
The relative vector is obtained by subtracting the positions of the Player and Main Camera.
- Drag and drop the port of the Set Variable node’s Offset field to the left side (where you want to create the destination node) and open the node creation menu.
- Select the Members tab
- Enter
-in the search field - Select
UnityEngine.Vector3operator -(Vector3 a, Vector3 b) from the list - Select Compute from the node type selection menu
- Confirm the node name with the
Enterkey.
Create a Get Transform.position node
Create a node to obtain the position of your own object (Main Camera).
- Drag and drop the port of the A field of Vector3.operator – to the left side (where you want to create the destination node) and open the node creation menu.
- Select the Members tab
- Enter `Transform positionP` in the search field
- Select
UnityEngine.Transformposition [Get] from the list - Select Compute from the node type selection menu
- Confirm the node name with the
Enterkey
The settings are set to obtain the coordinates of your own object from the beginning.
Copy and paste the Get Transform.position node.
Since we also want to get the Player’s coordinates, we will create another Transform.position node, and copy and paste it.
- Select the existing Get Transform.position Compute node
- Copy
- Windows:
Ctrl+C - Mac:
Cmd+C
- Windows:
- Move the mouse cursor near the bottom
- Paste
- Windows:
Ctrl+V - Mac:
Cmd+V
- Windows:
Editing Get Transform.position below
Set it to get the player’s coordinates.
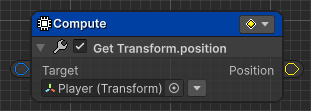
- Drag and drop the Player object in the Hierarchy window into the Target field of Get Transform.position below.

Port connection for Player position
Connect the ports so that the Player’s position is passed to the B field of Vector3.operator -.
- Drag and drop the Position port of the Player’s Get Transform.position to the B field port of Vector3.operator –
Creating a Late Update Node
Now that we have set the starting offset, we will create a function that will track it with each frame update.
- Press the
Spacekey on the graph below the Start node-related group to open the node creation menu. - Select the Scripts tab.
- Select Events/Late Update from the list.
- Confirm the node name by pressing the
Enterkey.
Create a Set Transform.position node
Create a node that sets the position of the Main Camera.
- Drag and drop the Late Update execution port to the right side (where you want to create the destination node) and open the node creation menu.
- Select the Members tab
- Enter
Transform positionin the search field - Select
UnityEngine.Transformposition [Set] from the list - Select Action from the node type selection menu
- Confirm the node name with the
Enterkey
Vector3.operator + Creating a node
Create an addition node to calculate “Player Position + Offset = Main Camera Position”.
- Drag and drop the input port of the Position field of Set Transform.position to the left side (where you want to create the destination node) and open the node creation menu.
- Select the Members tab
- Enter
+in the search field - Select
UnityEngine.Vector3operator +(Vector3 a, Vector3 b) from the list - Select Compute from the node type selection menu
- Confirm the node name with the
Enterkey.
Copy and paste the Player’s Get Transform.position node.
The Player’s Get Transform.position node has already been created, so just copy and paste it.
- Select the Compute node for Get Transform.position set in the Player
- Copy
- Windows:
Ctrl+C - Mac:
Cmd+C
- Windows:
- Move the mouse cursor to the left of the Vector3.operator+ node
- Paste
- Windows:
Ctrl+V - Mac:
Cmd+V
- Windows:
You can also connect directly from the existing Get Transform.position without copying.
In this example, we’re copying to make it easier to distinguish between the “Start group” and the “Late Update group”.
Port connection for Player position
Connect the ports so that the Player position is passed to the A field of Vector3.operator +.
- Drag and drop the Position port of the Player’s Get Transform.position to the A field port of Vector3.operator +
Create a Get node for the Offset variable
Create a node to obtain the value of the Offset variable.
- Drag and drop the input port of the B field of Vector3.operator + to the left side (where you want to create the destination node) and open the node creation menu.
- Select the Scripts tab
- Enter
Offsetin the search field - Select Offset [Get] (Compute) from the list
As you can see, you can also access variables from the Scripts tab in the node creation menu.
Try using them however you like.
The Compute node for obtaining variable values has a compact appearance, but its functionality is no different from other Compute nodes.
Main Camera operation check
Once you’ve done this, your graph will look like this:

Start playing once and check the behavior of the Main Camera.
- Confirm that the position of the Main Camera is updated to follow the player’s movement.
Nect time
Next time we will cover 3. Creating Item Behavior.
Post completion
If you would like to post on social media about the completion of the work up to this point, click here.
