If you haven’t completed the previous steps yet, please go through the previous tutorial on How to create Block Breaking first.
After playing a few times, you may find that after the ball hits a wall, it starts moving horizontally, making it virtually impossible to progress.
This is because Unity’s Physics settings set the speed towards the wall to 0 if the speed at the time of collision is below a certain value.
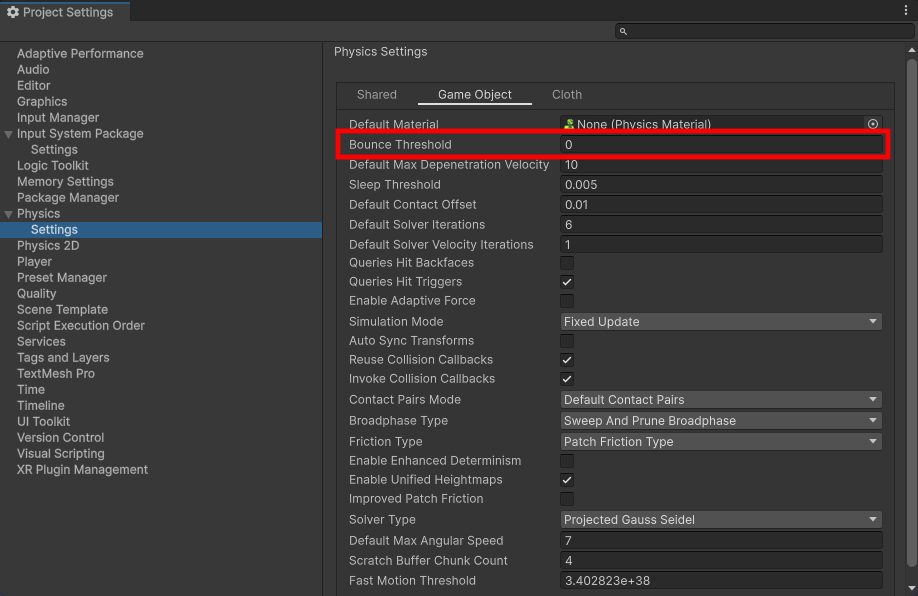
In Breakout, we want the ball to always bounce, so you can solve this problem by setting the Physics bounceThreshold to 0.
There are two ways to set this:
- Configure Project Settings
- Member Access Settings
Configure Project Settings
If you don’t need to change it depending on the scene, this can be easily solved by setting it in the Project Settings.
- Select Edit/Project Settings from the menu
- Select the Physics/Settings category
- Select the Game Object tab
- Change the Bounce Threshold field to
0

Member Access Settings
If you need to change it depending on the scene, you can set Physics.bounceThreshold via member access.
- Select the Main Logic object
- Drag and drop the execution port of the Start node to open the node creation menu
- Select the Members tab
- Enter
Physics bounceThresholdin the search field - Select bounceThreshold [Set] of
UnityEngine.Physicsfrom the list - Select Action from the node type selection menu
- Connect the transition port of the created Action node to the input port of the Game Start state
Once you’ve done this, your graph will look like this:

Complete
This completes the Logic Toolkit tutorial “How to create Block Breaking”
Content of study
Let’s review what we’ve learned.
- Use Logic Behavior components to control object behavior
- Use Logic Asset and Logic Player components to reuse common behaviors
- If it is a simple function, the member access script generation function allows you to configure the behavior without any coding work.
- Action nodes, State nodes, Branch nodes (flow control), etc. can coexist in the graph.
- State transition condition judgment can be shared with the Signal Evaluation node
- Share values with Blackboard variables
- Blackboard’s Data Link feature allows you to share variables between multiple objects
Post completion
If you would like to post on social media about the completion of the work up to this point, click here.
