If you haven’t completed the previous steps yet, please go through the previous tutorial on How to create Block Breaking first.
Up to this point, we have been using separate objects to switch between displaying game clear and game over, but we will now manage the progress of the game using the Main Logic object.
The game state will be shared with Blackboard Asset, and each object will access the game state through Blackboard’s Data Link.
Creating a Blackboard Asset
- Select the Logic folder in the Project window
- Click the + button
- Select Logic Toolkit/Blackboard from the menu
- Renamed to
Main Scene Blackboard
Editing Main Scene Blackboard
The variables to be created are as follows.
| Variable name | Type | Explanation |
|---|---|---|
| IsPlaying | bool | True while the game is being played (while the ball is moving and blocks can be broken). The ball starts moving when switched from false to true. If it changes from true to false, the game ends and a clear judgment is made. |
| IsGameClear | bool | True if the game is cleared at the end of the game. Will be false if the game is over. |
Creating the IsPlaying variable
- Select the Main Scene Blackboard and click the + button on the Blackboard in the Inspector window.
- Select Primitive/bool from the variable creation menu
- Renamed to
IsPlaying
Creating the IsGameClear variable
- In the Inspector window, click the Blackboard + button
- Select Primitive/bool from the variable creation menu
- Renamed to
IsGameClear
Added Logic Behavior to Main Logic
- Select Main Logic object
- Click the Add Component button in the Inspector window
- Select Logic Toolkit/Logic Behavior and add Logic Behavior component
- Click the Logic Behavior Edit button to open the Logic Editor window
Edit Logic Behavior of Main Logic
Use the State node to manage the progress of the state of Main Logic.
The states to be created are as follows.
| State name | Explanation |
|---|---|
| Game Start | The state immediately after the game starts. Displays the Game Start object while the Game Start state is active. Transition to the Game Playing state when you press the Submit button. |
| Game Playing | The state in which the game is being played. The ball moves and you can enjoy breaking blocks. When the IsPlaying variable becomes false, determine IsGameClear and transition to the Game Clear state or Game Over state. |
| Game Clear | Destroy all blocks and clear the game. Show Game Clear object. Reload the scene when you press the Submit button. |
| Game Over | The ball falls and the game is over. Show Game Over object. Reload the scene when you press the Submit button. |
A state is prepared as a type of execution node.
By connecting the State node with the Action node, Branch node, etc. that we have been using so far, we can incorporate states into the sequence of flows.
Creating a Main Scene data link
- Select the Blackboard tab in the side panel
- Select the Data Link tab
- Click the + button
- Rename to
Main Scene - Set Share Type field to Scene
- Set the Blackboard Asset field to Logic/Main Scene Blackboard asset
When you use the Data Link function to reference Blackboard, Data Links with the same Share Type, Tag, and Blackboard Asset are shared, allowing you to access the same variables.
Creating the Game Start state
- Drag and drop the execution port of the Start node to open the node creation menu
- Select the Scripts tab
- Select State from list
- Renamed to
Game Start
Adding GameObject.SetActive component
- Click the + button in the Components field of the Game Start state
- Select the Scripts tab
- Enter
GameObject SetActivein the search field - Select GameObject.SetActive(bool value) from the list
Up until now, GameObject.SetActive(bool value) has been used in the Action node, but it is implemented in a script called ActionComponent, so it can also be used as a component such as a State node.
Editing that GameObject.SetActive component
- Change the Methods field to only On Activated
- Set Canvas/Game Start object in Target field
You can set it in one of the following ways:- Change Self to Value and set the Canvas/Game Start object in the Object field
- Leave it as Self and drag and drop the Canvas/Game Start object from the Hierarchy window into the Target field
- Check Value field
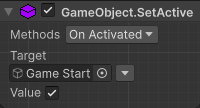
If you use ActionComponent for the State node, a Methods field will be added.
ActionComponent is a script that just executes a process immediately, so you can control when it executes by setting the Methods field.
In this case, On Activated is a setting that is executed when the state becomes active.
Adding a set component for the IsPlaying variable
- Drag and drop the IsPlaying variable of the Main Scene data link to the bottom of Components in the Game Start state to open the component addition menu.
- Select Set Variable from the list
Editing that set component for the IsPlaying variable
- Change the Methods field to only On Activated

Adding a GameObject.SetActive component
- Click the + button in the Components field of the Game Start state
- Select the Scripts tab
- Enter
GameObject SetActivein the search field - Select GameObject.SetActive(bool value) from the list
Editing that GameObject.SetActive component
- Change the Methods field to only On Deactivated
- Set Canvas/Game Start object in Target field
You can set it in one of the following ways:- Change Self to Value and set the Canvas/Game Start object in the Object field
- Leave it as Self and drag and drop the Canvas/Game Start object from the Hierarchy window into the Target field
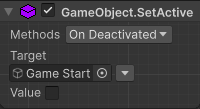
This time, On Deactivated is a setting that is executed when the state becomes inactive.
Adding an Input.GetButtonDown component
- Click the + button for Components in the Game Start node
- Select the Members tab
- Enter
Input GetButtonDownin the search field - Select GetButtonDown(string buttonName) of
UnityEngine.Inputfrom the list
Members whose return value is bool type are implemented using a script called EvaluateComponent.
EvaluateComponent is a node component for evaluating something.
This time, we will use Input.GetButtonDown(string buttonName) to determine if the button has been pressed, evaluate the press of the Submit button, and transition the state.
Editing that Input.GetButtonDown component
- Set Button Name field to
Submit

Creating the Game Playing State
- Drag and drop the signal port of the Signal field of the Input.GetButtonDown component to open the node creation menu
- Select the Scripts tab
- Select State from list
- Renamed to
Game Playing
If you connect the output signal port directly to the execution node, the transition will occur to the destination node when the conditions are met and the signal turns on.
Adding a set component for the IsPlaying variable
- Drag and drop the IsPlaying variable of the Main Scene data link to Components of the Game Playing state to open the add component menu
- Select Set Variable from the list
Editing that set component for the IsPlaying variable
- Change the Methods field to only On Activated
- Check the Is Playing field

Adding a Bool Equals component
- Click the + button for Components in the Game Playing state
- Select the Scripts tab
- Enter
Bool Equalsin the search field - Select Bool Equals from the list
Creating a Get IsPlaying Variable Node
You can also create variable access nodes by dragging and dropping data ports.
- Drag and drop the input port of the Value 1 field of the Bool Equals component and open the node creation menu
- Select the Scripts tab
- Enter
IsPlayingin the search field - Select IsPlaying [Get] (Compute) of
Compute/Variables/DataLink/Main Scenefrom the list
Creating a Time.timeScale node
While displaying the game results, try setting Time.timeScale to 0 to enter a pause state.
- Drag and drop the signal port of the Signal field of the Bool Equals component and open the node creation menu
- Select the Members tab
- Enter
Time timeScalein the search field - Select timeScale [Set] of
UnityEngine.Timefrom the list - Select Action from the node type selection menu
Signal ports can transition to flow control nodes such as States, Actions, Tasks, and Branches.
Creating a Branch Node
The processing branches depending on the value of the IsGameClear variable.
- Drag and drop the transition port of the Time.timeScale node and open the node creation menu
- Select the Scripts tab
- Select Flow Controls/Branch from the list
Creating a Get IsGameClear Variable Node
- Drag and drop the input port of the Condition field of the Branch node to open the node creation menu
- Select the Scripts tab
- Enter
IsGameClearin the search field - Select IsGameClear [Get] of
Compute/Variables/DataLink/Main Scenefrom the list
Creating a Game Clear state
- Drag and drop the transition port of the True field of the Branch node to open the node creation menu
- Select the Scripts tab
- Select State from the list
- Change the name to
Game Clear
Adding a GameObject.SetActive component
- Click the + button in the Components field of the Game Clear state to open the component addition menu
- Select the Scripts tab
- Enter
GameObject SetActivein the search field - Select GameObject.SetActive(bool value) from the list
Editing that GameObject.SetActive component
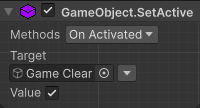
- Set the Methods field to On Activated only
- Set the Target field to the Canvas/Game Clear object
You can set it in one of the following ways:- Change Self to Value and set the Canvas/Game Clear object in the Object field
- Leave it as Self and drag and drop the Canvas/Game Clear object from the Hierarchy window into the Target field
- Check the Value field
Creating a Game Over state
- Drag and drop the transition port of the False field of the Branch node to open the node creation menu
- Select the Scripts tab
- Select State from the list
- Change the name to
Game Over
Adding a GameObject.SetActive component
- Click the + button in the Components field of the Game Over state to open the component addition menu
- Select the Scripts tab
- Enter
GameObject SetActivein the search field - Select GameObject.SetActive(bool value) from the list
Editing that GameObject.SetActive component
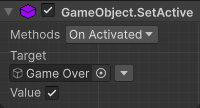
- Set the Methods field to On Activated only
- Set the Target field to the Canvas/Game Over object
You can set it in one of the following ways:- Change Self to Value and set the Canvas/Game Over object in the Object field
- Leave it as Self and drag and drop the Canvas/Game Over object from the Hierarchy window into the Target field
- Check the Value field
Creating a Signal Evaluation node
The Game Clear state and Game Over state both have the behavior of reloading the scene when the Submit button is pressed.
If there is a transition condition, you can use the Signal Evaluation node to standardize the judgment.
- Drag and drop the signal port of the Game Clear state to open the node creation menu.
- Select the Scripts tab.
- Select Signals/Signal Evaluation from the list.
The signal port in the State header will be on while the state is active.
By connecting a Signal Evaluation node to this signal port, you will be able to determine transition conditions while the state is active.
Adding a Input.GetButtonDown component
- Click the + button in Conditions of the Signal Evaluation node
- Select the Scripts tab
- Enter
Input GetButtonDownin the search field - Select Input.GetButtonDown(string buttonName) from the list
Editing that Input.GetButtonDown component
- Set the Button Name field to
Submit

Connecting the Game Over state to the Signal Evaluation node
- Drag and drop the signal port of the Game Over state to the input port of the Signal Evaluation node (the port connected to the Game Clear state) to connect it.
If multiple signal wires are connected to the same input port, the result will be true if any one of the signals is on.
Creating a Time.timeScale node
Set Time.timeScale back to 1 before reloading the scene.
- Drag and drop the transition port of the Signal Evaluation node to open the node creation menu.
- Select the Scripts tab.
- Enter
Time timeScalein the search field. - Select Set Time.timeScale (Action) from the list.
Editing that Time.timeScale node
- Change the Time Scale field to
1

Creating a SceneManager.LoadScene node
- Drag and drop the transition port of the Time.timeScale node and open the node creation menu.
- Select the Members tab.
- Enter
SceneManager LoadScenein the search field. - Select LoadScene(string sceneName) of
UnityEngine.SceneManagement.SceneManagerfrom the list. - Select Action from the node type selection menu.
Editing that SceneManager.LoadScene node
- Change the Scene Name field to
BlockBreaking

Main Logic Graph
Once you’ve done this, your graph will look like this:

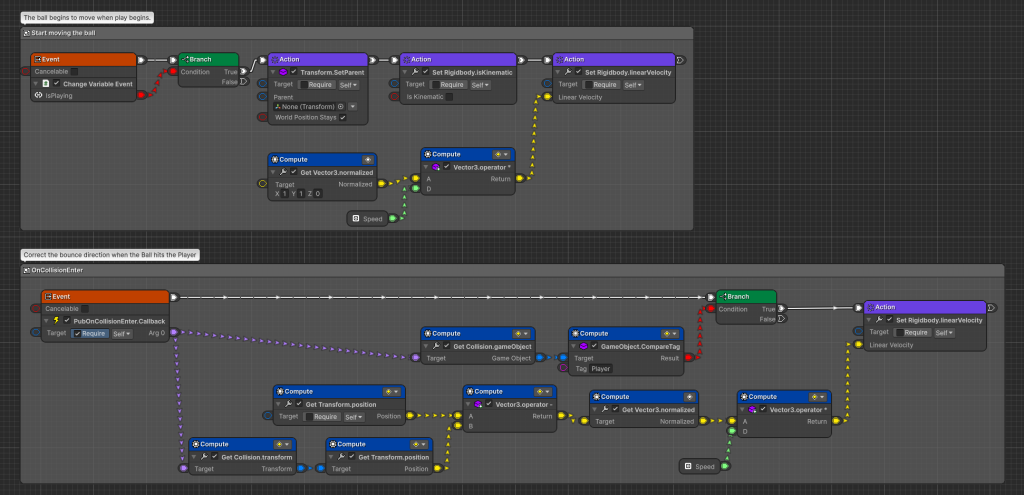
Ball behavior changes
Change the behavior so that movement begins when the IsPlaying variable becomes true.
Preparing for Change
- Select the Ball object in Player/Ball Socket
- Open the Ball object’s Logic Behavior in the Logic Editor window.
Creating a Main Scene data link
- Select the Blackboard tab in the side panel
- Select the Data Link tab
- Click the + button
- Rename to
Main Scene - Set Share Type field to Scene
- Set the Blackboard Asset field to Logic/Main Scene Blackboard asset
Create an event node for changing the IsPlaying variable
- Delete the Start node
- Drag and drop the IsPlaying variable of the Main Scene data link to the area where the Start node was, and open the node creation menu.
- Select Change Variable Event (Event) from the list.
Creating a Branch Node
- Drag and drop the output port of the Is Playing field of the event node to change the IsPlaying variable, and open the node creation menu.
- Select the Scripts tab.
- Select Flow Controls/Branch from the list.
Connecting to a Branch node
- Drag and drop the execution port of the IsPlaying variable change event node to the input port of the Branch node to connect it.
- Drag and drop the transition port of the True field of the Branch node to the input port of the Transform.SetParent node to connect it.
Ball Graph
Once you’ve done this, your graph will look like this:
Blocks behavior changes
The clear determination will be made so that when all objects are destroyed, a notification is sent to the Main Logic.
This time, we share the Main Scene Blackboard using the Data Link function, set the IsGameClear variable to true, and then set the IsPlaying variable to false, which will switch the Main Logic to the Game Clear state.
Preparing for Change
- Select the Blocks object
- Open the Logic Behavior of the Blocks object in the Logic Editor window.
Creating a Main Scene data link
- Select the Blackboard tab in the side panel
- Select the Data Link tab
- Click the + button
- Rename to
Main Scene - Set Share Type field to Scene
- Set the Blackboard Asset field to Logic/Main Scene Blackboard asset
Create a setting node for the IsGameClear variable
- Delete the GameObject.SetActive node that activates the Game Clear object
- Drag and drop the IsGameClear Main Scene data link to the area where the GameObject.SetActive node was located, and open the node creation menu.
- Select Set Variable (Action) from the list.
Editing that setting node for the IsGameClear variable
- Check the Is Game Clear field

Connecting to that setting node for the IsGameClear variable
- Drag and drop the execution port of the Int Equals node to the input port of the Is Game Clear variable setting node to connect it.
Create a setting node for the IsPlaying variable
- Drag and drop the IsPlaying Main Scene data link to the right of the IsGameClear variable setting node and open the node creation menu.
- Select Set Variable (Action) from the list.
Connecting to that setting node for the IsPlaying variable
- Drag and drop the transition port of the IsGameClear variable’s setting node to the input port of the IsPlaying variable’s setting node to connect it.
Blocks Graph
Once you’ve done this, your graph will look like this:

Wall Bottom behavior changes
Change the system so that the game over determination when the ball falls is notified to the Main Logic side.
This time, we share the Main Scene Blackboard using the Data Link function, set the IsGameClear variable to false, and then set the IsPlaying variable to false, which will switch the Main Logic to the Game Over state.
Preparing for Change
- Select the Walls/Wall Bottom object
- Open the Logic Editor window for the Wall Bottom object’s Logic Behavior.
Creating a Main Scene data link
- Select the Blackboard tab in the side panel
- Select the Data Link tab
- Click the + button
- Rename to
Main Scene - Set Share Type field to Scene
- Set the Blackboard Asset field to Logic/Main Scene Blackboard asset
Create a setting node for the IsGameClear variable
- Delete the GameObject.SetActive node that activates the Game Over object
- Drag and drop the IsGameClear Main Scene data link to the area where the GameObject.SetActive node was located, and open the node creation menu.
- Select Set Variable (Action) from the list.
Connecting to that setting node for the IsGameClear variable
- Drag and drop the transition port of the GameObject.Destroy node to the input port of the Is Game Clear variable setting node to connect it.
Create a setting node for the IsPlaying variable
- Drag and drop the IsPlaying Main Scene data link to the right of the IsGameClear variable setting node and open the node creation menu.
- Select Set Variable (Action) from the list.
Connecting to that setting node for the IsPlaying variable
- Drag and drop the transition port of the IsGameClear variable’s setting node to the input port of the IsPlaying variable’s setting node to connect it.
Wall Bottom Graph
Once you’ve done this, your graph will look like this:

Check the behavior of the main logic
Play it and see how the game works.
- Immediately after starting play, confirm that the ball does not move
- Confirm that the ball moves in tandem with the player’s movement
- Confirm that it starts moving when the Submit button (Space key or Enter key by default) is pressed
- Confirm that Game Clear is displayed when all blocks are destroyed
- Confirm that the scene is reloaded when the Submit button is pressed while Game Clear is displayed
- Confirm that the game continues to operate even after the scene is reloaded
- Confirm that Game Over is displayed when the ball falls
- Confirm that the scene is reloaded when the Submit button is pressed while Game Over is displayed
Next time
Next time we will cover 7. Setting Physics Bounce Threshold.
Post completion
If you would like to post on social media about the completion of the work up to this point, click here.
