If you haven’t completed the previous steps yet, please go through the previous tutorial on How to create Block Breaking first.
Create the Ball behavior.
We will implement a process that starts moving the ball diagonally at the start, and when it collides with the player, adjusts the bounce direction depending on the contact position.
Adding Logic Behavior to Ball
- Select the Ball object in Player/Ball Sockets
- Click the Add Component button in the Inspector window
- Select Logic Toolkit/Logic Behavior and add Logic Behavior component
- Click the Logic Behavior Edit button to open the Logic Editor window
Edit Ball’s Logic Behavior
Creating a Transform.SetParent node
In order to start movement later by key operation, the initial setting is to move in conjunction with the Player.
When you start moving, change the parent object with Transform.SetParent to change it from a child of Player to directly under the root.
- Drag and drop the execution port of the Start node to open the node creation menu
- Select the Members tab
- Enter
Transform SetParentin the search field - Select SetParent(Tranform parent, bool worldPositionStays) of
UnityEngine.Transformfrom the list - Select Action from the node type selection menu
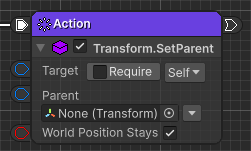
Editing that Transform.SetParent node
- Change the mode of the Parent field to Value
- Check the World Position Stays field
Creating a Rigidbody.isKinematic node
In the initial state, Rigidbody’s Is Kinematic is enabled.
We want the ball to physically reflect when it hits a wall or block at the same time it starts moving, so we disable Is Kinematic.
- Drag and drop the transition port of the Transform.SetParent node and open the node creation menu
- Select the Members tab
- Enter
Rigidbody isKinematicin the search field - Select isKinematic [Set] of
UnityEngine.Rigidbodyfrom the list - Select Action from the node type selection menu
The Is Kinematic field is unchecked by default, so you do not need to change any settings.
Creating a Rigidbody.linearVelocity node
- Drag and drop the transition port of the Rigidbody.isKinematic node and open the node creation menu
- Select the Scripts tab
- Select Actions/LogicToolkitGeneratedScripts/UnityEngine/Rigidbody/Set Rigidbody.linearVelocity (Action)
The Set Rigidbody.linearVelocity script has already been created when creating Player behavior, so it can also be selected from the Scripts tab.
Of course, the same script will be used even if you select the same member on the Members tab, so feel free to use it as you like.
Creating a Vector3.operator * node
- Drag and drop the input port of the Linear Velocity field of the Rigidbody.linearVelocity node to open the node creation menu
- Select the Members tab
- Enter
*in the search field - Select operator *(Vector3 a, float d) of
UnityEngine.Vector3from the list - Select Compute from the node type selection menu
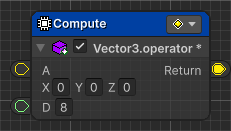
Editing that Vector3.operator * node
- Set D field value to
8
Creating a Vector3.normalized node
- Drag and drop the input port of the A field of the Vector3.operator * node to open the node creation menu
- Select the Members tab
- Enter
normalizedin the search field - Select normalized [Get] of
UnityEngine.Vector3from the list - Select Compute from the node type selection menu
Editing that Vector3.normalized node
- Set the X value of the Target field to
1 - Set the Y value of the Target field to
1
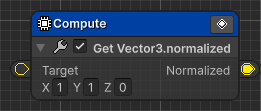
You can set a fixed value directly in the field without having to create a new Vector3 node.
Combine groups (optional)
We were able to implement a behavior that starts moving diagonally immediately after the start.
Let’s organize the nodes connected from the Start node into a group node.
- With all nodes connected from the Start node selected, press the
G keyto create a group node. - Change group node name to
Start moving the ball - Click the icon that appears when you hover over the group node
- In the comment, enter
The ball begins to move when play begins.
Creating a PubOnCollisionEnter.Callback node
From here, we will implement processing to adjust the reflection direction based on the positional relationship between the paddle and the ball when it comes into contact with the Player.
- Press the
Space keybelow the Start node to open the node creation menu - Select the Members tab
- Enter
OnCollisionEnter Callbackin the search field - Select Callback of
LogicToolkit.Builtin.Messages.PubOnCollisionEnterfrom the list - Select Event from the node type selection menu
Types in the LogicToolkit.Builtin.Messages namespace are built-in components that call other methods via UnityEvents when a MonoBehavior message is called.
This time, I am using the OnCollisionEnter(Collision) message to receive it as a Logic Toolkit event.
Editing that PubOnCollisionEnter.Callback node
- Check Require in Target field
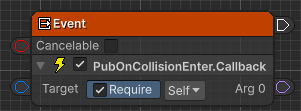
The Target field type is InputComponent<PubOnCollisionEnter>.
The Require field provides the ability to add and retrieve a component if it does not exist in the target object.
This time, since Require is checked, the PubOnCollisionEnter component will be added at runtime even if it has not been added to the self object (Ball).
Depending on the purpose of the object, the processing load that is added each time may become a problem.
It is a good idea to consider whether to add components to the object in advance.
Creating a Collision.gameObject node
- Drag and drop the output port of the Arg 0 field of the PubOnCollisionEnter.Callback node to open the node creation menu
- Select the Members tab
- Select Collision/gameObject [Get] from the list
- Select Compute from the node type selection menu
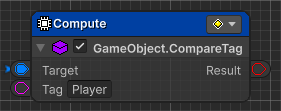
Creating a GameObject.CompareTag node
- Drag and drop the output port of the Game Object field of the Collision.gameObject node to open the node creation menu
- Select the Members tab
- Select GameObject/CompareTag(string tag) from the list
- Select Compute from the node type selection menu
Editing that GameObject.CompareTag node
- Set the string in the Tag field to
Player
Creating a Branch node
- Drag and drop the output port of the Result field of the GameObject.CompareTag node to open the node creation menu
- Select the Scripts tab
- Select Flow Controls/Branch from the list
Connecting to that Branch node
- Connect by dragging and dropping from the execution port of the PubOnCollisionEnter.Callback node to the input port of the Branch node.
Creating a Rigidbody.linearVelocity node
- Drag and drop the execution port of the Branch node’s True field to open the node creation menu
- Select the Scripts tab
- Enter
Rigidbody linearVelocityin the search field - Select Set Rigidbody.linearVelocity (Action) from the list
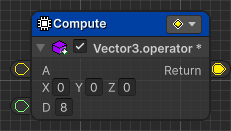
Creating a Vector3.operator * node
- Drag and drop the input port of the Linear Velocity field of the Rigidbody.linearVelocity node to open the node creation menu
- Select the Scripts tab
- Enter
*in the search field - Select Vector3.operator *(Vector3 a, float d) (Compute) from the list
Editing that Vector3.operator * node
- Set the value in the D field to
8
Creating a Vector3.normalized node
- Drag and drop the input port of the A field of the Vector3.operator * node to open the node creation menu
- Select the Scripts tab
- Enter
normalizedin the search field - Select Get Vector3.normalized (Compute) from the list
Creating a Vector3.operator – node
- Drag and drop the input port of the Target field of the Vector3.normalized node to open the node creation menu
- Select the Members tab
- Enter
-in the search field - Select operator -(Vector3 a, Vector3 b) of
UnityEngine.Vector3from the list - Select Compute from the node type selection menu
Creating a Transform.position node
- Drag and drop the input port of the A field of the Vector3.operator – node to open the node creation menu
- Select the Members tab
- Enter
Transform positionin the search field - Select position [Get] of
UnityEngine.Transformfrom the list - Select Compute from the node type selection menu
Creating a Collision.transform node
- Drag and drop the output port of the Arg 0 field of the PubOnCollisionEnter.Callback node below the Transform.position node you created earlier, and open the node creation menu.
- Select the Members tab
- Select Collision/transform [Get] from the list
- Select Compute from the node type selection menu
Create another Transform.position node
- Drag and drop the output port of the Transform field of the Collision.transform node to open the node creation menu
- Select the Members tab
- Enter
positionin the search field - Select position [Get] of
UnityEngine.Transformfrom the list - Select Compute from the node type selection menu
Data port connection
- Connect by dragging and dropping from the input port of the B field of Vector3.operator – node to the output port of the Position field of the last created Transform.position node.
Group (optional)
Let’s group the nodes connected from OnCollisionEnter into a group node.
- With all nodes connected from the PubOnCollisiionEnter.Callback node selected, press the
G keyto create a group node. - Change group node name to
OnCollisionEnter - Click the icon that appears when you hover over the group node
- In the comments, enter
Correct the bounce direction when the Ball hits the Player
Variable speed (optional)
As with Player, it will be useful later if you convert the movement speed into a variable.
- Select the Blackboard tab in the side panel
- Select Root tab
- Click the + button to open the type selection menu
- Select Primitive/float from the list
- Set name to
Speed - set number to
8 - Drag and drop the Speed variable near the D field of the Vector3.operator * node on the Start node side of the graph to open the node creation menu.
- Select Get Variable (Compute)
- Connect by dragging and dropping from the output port of the Speed acquisition node to the input port of the D field of the Vector3.operator * node.
- Similarly, on the OnCollisionEnter.Callback node side, drag and drop it near the D field of the Vector3.operator * node and open the node creation menu.
- Select Get Variable (Compute)
- Connect by dragging and dropping from the output port of the Speed acquisition node to the input port of the D field of the Vector3.operator * node.
Check Ball behavior
Once you’ve done this, your graph will look like this:
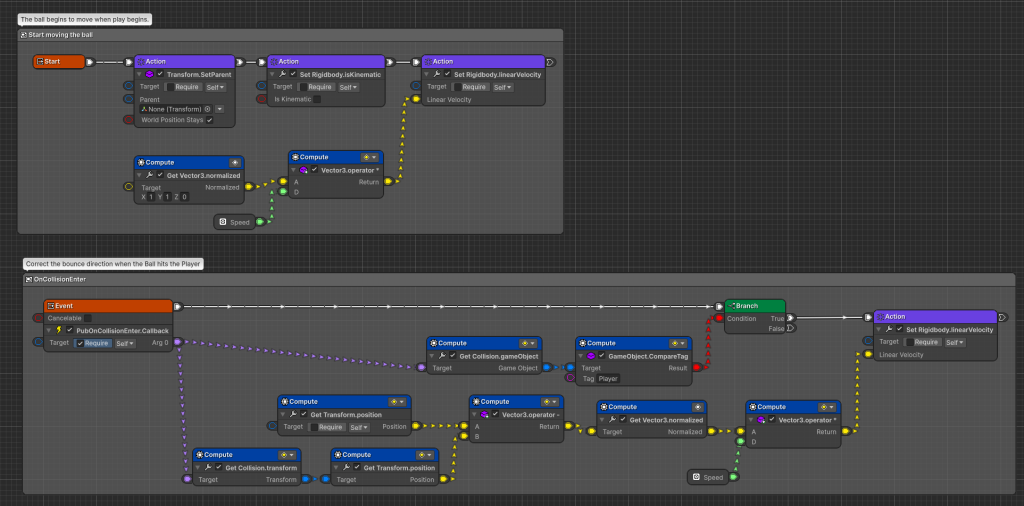
Start playing and check the behavior of the ball.
- Confirm that it starts moving to the upper right at the same time as play starts.
- When hitting the Player (light blue paddle), the reflection angle differs depending on the position of the hit.
- If it hits the left side of the paddle, it will reflect to the left.
- If it hits the right side of the paddle, it will be reflected to the right.
Next time
Next time we will cover 3. Creating Block behavior.
Post completion
If you would like to post on social media about the completion of the work up to this point, click here.
