If you haven’t prepared your project yet, please do so first by learning How to create Block Breaking.
Create the behavior of the Player (light blue paddle).
Implement the behavior of moving the paddle using the AD key or left/right keys using the Logic Behavior component.
Adding Logic Behavior to Player
- Select Player object
- Click the Add Component button in the Inspector window
- Add the Logic Behavior component by selecting Logic Toolkit/Logic Behavior from the component addition menu.
- Click the Logic Behavior Edit button to open the Logic Editor window
Edit Player’s Logic Behavior
Implement paddle movement by calculating the movement speed from the horizontal axis input using Input.GetAxis("Horizontal") and assigning it to Rigidbody.linearVelocity.
Creating an Update node
- Delete the Start node
- Click on the graph and press the
Spacebarwhile it has focus to open the node creation menu - Select the Scripts tab
- Select Events/Update from the list and create an Update node
Creating a settings node for Rigidbody.linearVelocity
Access members using the Logic Toolkit’s script generation feature.
- Drag and drop the execution port of the Update node near the right side of the node and open the node creation menu
- Select the Members tab
- Enter
Rigidbody linearVelocityin the search field - Select linearVelocity [Set] of
UnityEngine.Rigidbodyfrom the list - Select Action from the node type selection menu
When you create a member access script on the Members tab, a new assembly will be created if it has not yet been created for script generation.
If you create a node with the assembly set to [Unselected], the name defaults to LogicToolkitGeneratedScripts.
You can create an assembly with any name by clicking the assembly dropdown and selecting Create New Assembly from the menu.
Also, changing assembly names is not recommended.
If you change it later, the script reference will be broken, so please be careful not to make any mistakes.
The default name is usually fine.
The sample BlockBreaking is named BlockBreaking_GeneratedScripts to avoid duplication when imported.
Files for script generation are created in the Assets/Logic Toolkit/Generated Scripts/assembly name folder.
Basically, there is no need to directly modify files for script generation.
Creating a new Vector3 node
- Drag and drop the input port of the Linear Velocity field near the left side and open the node creation menu
- Select the Members tab
- Enter
new Vector3in the search field - Select new Vector3(float x, float y, float z) of
UnityEngine.Vector3from the list - Select Compute from the node type selection menu
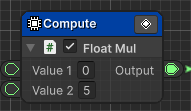
Creating a Float Mul node
- Drag and drop the input port of the X field near the left side and open the node creation menu
- Select the Scripts tab
- Enter
Float Mulin the search field - Select Float Mul (Compute) from the list
Editing that Float Mul node
Set movement speed to 5
- Set the value in the Value 2 field to
5

Creating an Input.GetAxis node
- Drag and drop the input port of the Value 1 field of the Float Mul node near the left side and open the node creation menu
- Select the Members tab
- Enter
Input GetAxisin the search field - Select GetAxis(string axisName) of
UnityEngine.Inputfrom the list - Select Compute from the node type selection menu
Editing that Input.GetAxis node
Set to output horizontal input.
- Set Axis Name field string to
Horizontal

Variable speed (optional)
If you write the movement speed directly in the Float Mul, it will be difficult to see where the speed is written when you look back on it later, so it is better to keep such numbers as variables on the blackboard.
- Select the Blackboard tab in the side panel
- Select Root tab
- Click the + button to open the type selection menu
- Select Primitive/float from the list
- Set name to
Speed - set number to
5 - Drag and drop the Speed variable near the Value 2 field of Float Mul in the graph and open the node creation menu
- Select Get Variable (Compute)
- Connect by dragging and dropping from the output port of the Speed acquisition node to the input port of the Value 2 field of Float Mul.
Check Player behavior
Once you’ve done this, your graph will look like this:

Start playing and check the behavior of the Player (light blue paddle).
- Make sure to move left using
A keyorLeft arrow key. - Make sure to move right using
D keyorRight arrow key. - Make sure it stops when it hits a wall
Next time
Next time we will cover 2. Creating Ball behavior.
Post completion
If you would like to post on social media about the completion of the work up to this point, click here.
