If you haven’t completed the previous tutorials yet, please complete them starting from Basic Usage.
Here we will introduce how to wait for a certain period of time in the Logic Toolkit.
The details are as follows:
- Create a GameObject with a Logic Behavior component.
- Open and edit the graph in the Logic Editor window.
- Use a Task node that waits a specified number of seconds.
Create a scene
If you have other scenes open, it will be confusing, so create a new scene.
- Select File > New Scene from the menu.
- In the New Scene window, select Basic (URP).
- Click the Create button
Creating a GameObject with Logic Behavior
Create a GameObject with a Logic Behavior component added to the Scene.
- Click the + button in Hierarchy.
- Select Logic Toolkit > Logic Behavior from the menu.
- Confirm the name by pressing
Enter.
Opening the Logic Editor window
Graphs of Logic Behavior components are edited in the Logic Editor window.
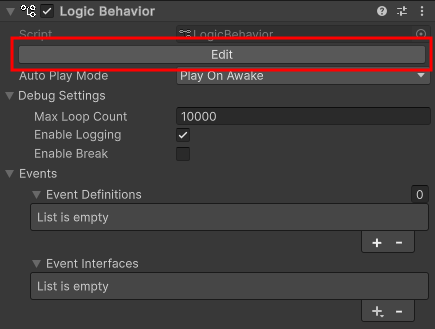
If the window is not displayed, select a GameObject and click the “Edit” button in the Inspector to display it.
- Select the Logic Behavior object
- Click the Edit button on the Logic Behavior component in the Inspector window.

If the Logic Editor window is already displayed, the graph will switch in conjunction with selecting a GameObject in the Hierarchy window.
Create Wait For Seconds
Let’s create a Wait For Seconds Task node in the Graph View.
- Drag the Output Execute Port of the Start node
- Drop onto the graph view near the right side to open the node creation menu
- Select the Scripts tab.
- Select Tasks > Wait For Seconds from the list.
- Confirm the node name with the
Enter key.
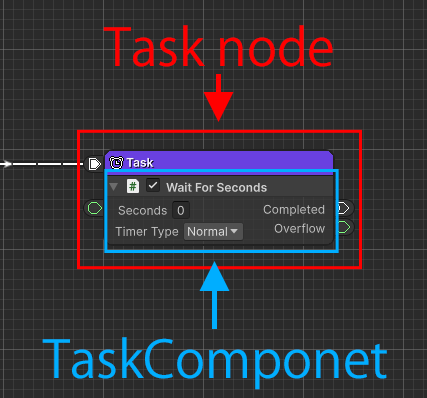
Task Nodes and TaskComponents
Let’s explain the Task node of the Wait For Seconds component that we created.
A Task node is a node that performs some kind of processing and waits for completion before transitioning to the next step.
The processing to be performed is defined in the TaskComponent.

When a Task node is executed, the process defined in the TaskComponent is executed and waits until completion before transitioning to the next node.
This time we are using a TaskComponent called Wait For Seconds, which waits for a specified number of seconds to pass.
There are many advantages to creating nodes and node components separately, but for now it is enough to remember that Task nodes and TaskComponents are defined separately and are executed by combining them.
Wait For Seconds Settings
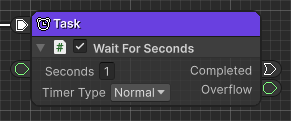
Set the Seconds field in Wait For Seconds to “1”.
- Set the Seconds field in Wait For Seconds to
1.

Create Debug.Log
Let’s display in Debug.Log that the wait has completed.
- Drag the Completed port of Wait For Seconds
- Drop onto the graph view near the right side to open the node creation menu
- Select the Scripts tab.
- Select Actions > Debug > Debug.Log from the list.
- Confirm the node name with the
Enter key.
Debug.Log Settings
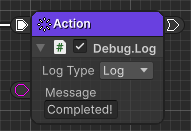
Set the Message field in Debug.Log to “Completed!”
- Set the Message field to
Completed!

Play and check
Once you’ve done this, your graph will look like this:

Press the play button to see how it works.
- If you look at the graph view while playing, you can see that Wait For Seconds is waiting for 1 second.
- After one second has passed, confirm that “Completed!” is displayed in the Console window.
If the Console window is not visible, select Window > General > Console from the menu to display it.
In the video, the Playmode tint has been changed to red to make the playmode easier to understand.
In this way, the Task node waits for processing to complete before transitioning to the next node.
If there is no next connection for the Task node, execution will end there.
Save the scene
We will use what we have covered so far next time, so please save the scene.
- Press
Ctrl S(Win) or⌘ S(Mac) or select File > Save from the menu - Select the Assets folder
- Save it as
Task
Next time
Next time, we will Return to the beginning with the Restart node.
If you try the trial version and like it, you can purchase it from the Asset Store.
