If you haven’t completed the previous tutorials yet, please complete them starting from Basic Usage.
Here we will introduce a way to loop back to the first node and execute it repeatedly when the end of the node is reached.
The steps are as follows:
- Open the scene created with Wait on Task node
- Open and edit the graph in the Logic Editor window.
- Use the Restart node to go back to the first node to be executed and restart it.
Open the “Wait on Task node” scene
We will be changing what we did in the previous Wait on Task node, so if you haven’t opened the previous scene yet, please open it.
- Double-click the Assets / Task scene in the Projects window to open it.
Save Scene As
Overwriting a modified Task scene can cause confusion, so be sure to save it under a different name first.
- Select File > SaveAs… from the menu.
- Select the Assets folder
- Save as
Restart
Opening the Logic Editor window
Graphs of Logic Behavior components are edited in the Logic Editor window.
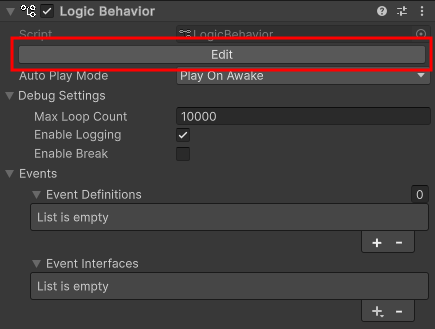
If the window is not displayed, select a GameObject and click the “Edit” button in the Inspector to display it.
- Select the Logic Behavior object
- Click the Edit button on the Logic Behavior component in the Inspector window.
If the Logic Editor window is already displayed, the graph will switch in conjunction with selecting a GameObject in the Hierarchy window.
Create a Restart node
Let’s create a Restart node.
- Drag the Output Transition Port of the Debug.Log Action node
- Drop onto the graph view near the right side to open the node creation menu
- Select the Scripts tab.
- Select Flow Controls > Restart from the list.
About Restart Node
The Restart node returns to the first node and restarts.
Which node it returns to depends on the connection status, but in this case it returns to the Wait For Seconds Task node, which is connected to the Start node.

Of course, you can also loop the wires together to repeat the process without using the Restart node.
Use whichever you prefer.
Play and check
Once you’ve done this, your graph will look like this:

Press the play button to see how it works.
- If you look at the graph view while playing, you can see that Wait For Seconds is waiting for 1 second.
- After one second has passed, confirm that “Completed!” is displayed in the Console window.
(So far, we have covered the Wait on Task node) - Again, go back to Wait For Seconds and make sure it’s waiting for 1 second.
- Repeat after that
If the Console window is not visible, select Window > General > Console from the menu to display it.
In the video, the Playmode tint has been changed to red to make the playmode easier to understand.
Next time
Next time, we will do Get random numbers by member access.
If you try the trial version and like it, you can purchase it from the Asset Store.