If you haven’t completed the previous tutorials yet, please complete them starting from Basic Usage.
This time, let’s use the Event node to wait for a trigger.
The details are as follows:
- Create a GameObject with a Logic Behavior component.
- Open and edit the graph in the Logic Editor window.
- Wait for a UI Button click with the Button.onClick event.
Create a new scene
If you have other scenes open, it will be confusing, so create a new scene.
- Select File > New Scene from the menu.
- In the New Scene window, select Basic (URP).
- Click the Create button
Creating a GameObject with Logic Behavior
Create a GameObject with a Logic Behavior component added to the Scene.
- Click the + button in Hierarchy.
- Select Logic Toolkit > Logic Behavior from the menu.
- Confirm the name by pressing
Enter.
Opening the Logic Editor window
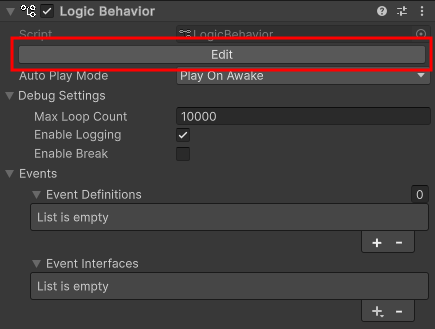
Graphs of Logic Behavior components are edited in the Logic Editor window.
If the window is not displayed, select a GameObject and click the “Edit” button in the Inspector to display it.
- Select the Logic Behavior object
- Click the Edit button on the Logic Behavior component in the Inspector window.
If the Logic Editor window is already displayed, the graph will switch in conjunction with selecting a GameObject in the Hierarchy window.
Create an Event node for Button.onClick
Create an Event node that listens for Button.onClick.
- Click on the graph view to give it focus
- Press the
Space keyto open the node creation menu - Select the Members tab
- Enter
Button.onClickin the search field - Select onClick of
UnityEngine.UI.Buttonfrom the list. - Select Event from the node type selection menu
- Wait for compilation to finish
- Confirm the node name with the
Enter key
About Event Nodes and EventComponents
We will explain the Event node and EventComponent that we created.
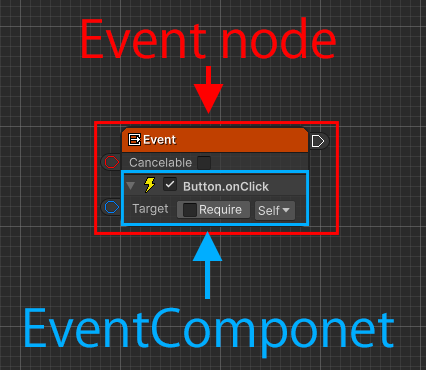
A vent node is a node that detects specific triggers and executes the connected node.
When an event trigger is detected, it executes the node connected to the execution port.
The type of event trigger to detect is defined in a node component called EventComponent.
This time, we use the member access function to create and use an EventComponent that waits for the invocation of an onClick event of type UnityEngine.UI.Button.
If you specify a Button component that waits for a click in the Target field, the node connected to the execution port of the Event node will be executed when that button is clicked.
The Start node we have used so far is also a type of Event node.
Creating a Button
Create a Button in the scene.
- Click the + button in Hierarchy.
- From the menu, select UI > Button – TextMeshPro
- When the TMP Importer window appears, click Import TMP Essentials.
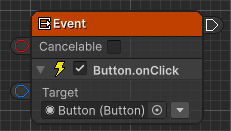
Setting Button.onClick
Set the created Button
- Set the Target field to Button
(You can set it by changing the reference type from Self to Value and then setting the object field, or by dragging and dropping a Button object from the Hierarchy into the Target field.)
Create a Debug.Log Action node
When the button is pressed, a message will be output to the console.
- Drag the output execute port of the Event node
- Drop it near the right side to open the node creation menu
- Select the Scripts tab
- Select Actions > Debug > Debug.Log from the list
- Confirm the node name by pressing
Enter key.
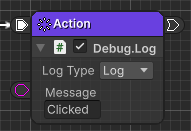
Debug.Log Settings
CSet the string to be displayed on the console.
- Set the Message field to
Clicked
Play and check
Once you’ve done this, your graph will look like this:

Press the play button to see how it works.
- When you click the button, confirm that
Clickedis output to the Console.
If the Console window is not visible, select Window > General > Console from the menu to display it.
Next time
Next time, we will do State management with State node.
If you try the trial version and like it, you can purchase it from the Asset Store.