If you haven’t completed the previous tutorials yet, please complete them starting from Basic Usage.
The version of the Logic Toolkit used in this tutorial is 1.10.0.
If you are using an older version, please update it before continuing.
This time, let’s use Execute Task-related components to create a hierarchy of execution flows.
The contents are as follows:
- Create a GameObject with a Logic Behavior component.
- Open and edit the graph in the Logic Editor window.
- Execute child nodes with Execute Task.
- Selectively execute child nodes with Switch Execute Task.
- Selectively execute child nodes with If Execute Task.
Create a new scene
If you have other scenes open, it will be confusing, so create a new scene.
- Select File > New Scene from the menu.
- In the New Scene window, select Basic (URP).
- Click the Create button
Creating a GameObject with Logic Behavior
Create a GameObject with a Logic Behavior component added to the Scene.
- Click the + button in Hierarchy.
- Select Logic Toolkit > Logic Behavior from the menu.
- Confirm the name by pressing
Enter.
Opening the Logic Editor window
Graphs of Logic Behavior components are edited in the Logic Editor window.
If the window is not displayed, select a GameObject and click the “Edit” button in the Inspector to display it.
- Select the Logic Behavior object
- Click the Edit button on the Logic Behavior component in the Inspector window.
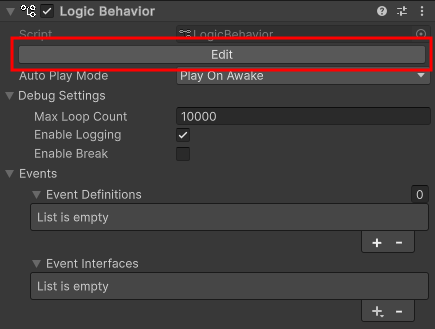
If the Logic Editor window is already displayed, the graph will switch in conjunction with selecting a GameObject in the Hierarchy window.
Creating a State node
This time we will use the Execute Task component in the State node.
- Drag the output execute port of the Start node
- Drop it near the right side to open the node creation menu
- Select the Scripts tab
- Select State from the list
- Confirm the node name with the
Enter key
Add Execute Task
Add an Execute Task component to the State node.
- Click the + button on the Components of the State node.
- Select Tasks > Execute Task from the node component addition menu.
About Execute Task
Execute Task is a TaskComponent for executing the node (hereafter referred to as the child node for convenience) connected to the Execute port.
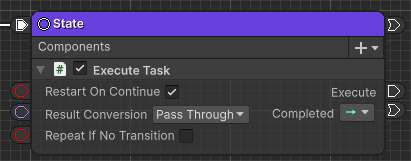
By using this, you can easily create a hierarchy for the execution flow.
In other words, it creates a hierarchical structure in which the State is the parent node and the destination of the Execute Task is the child node.
Adding Condition Evaluate
When the State transitions, let’s check whether the child node of Execute Task has finished executing.
Add a Condition Evaluate component to the State node.
- Click the + button on the Components of the State node
- Select Evaluators > Condition Evaluate from the node component addition menu
Creating another State node
Create a destination node for the Condition Evaluate.
- Drag the Completed port of Condition Evaluate
- Drop it near the bottom of an existing State node to open the node creation menu
- Select the Scripts tab
- Select State from the list
- Confirm the node name with the
Enter key
We don’t need to set any content since we just need to know that a transition has occurred.
Create a Wait For Seconds Task node
Then use Wait For Seconds as a child of Execute Task.
- Drag the Execute port of the Execute Task
- Drop it near the right side to open the node creation menu
- Select the Scripts tab
- Select Tasks > Wait For Seconds from the list
- Confirm the node name with the
Enter key
About the Execution Wire
In previous tutorials, we have used execution wires in Start nodes, If nodes, Event nodes, etc., but have not provided a detailed explanation of them.
Execution wires really come into their own when used to create a hierarchical execution flow, as in this case, so we will explain them in detail this time.
An execution wire is a wire used to execute “a destination node and the nodes connected from that node by transition wires (a group of execution flows)”.
The parent node executes the node (child node) that the execution wire is connected to, and the child nodes transition one after the other depending on their respective conditions.
When the parent node finishes execution, the child node’s execution will also be terminated, regardless of its execution status.
In this case, the transition from Condition Evaluate to the second State will terminate Wait For Seconds and its destinations, even if they are in the middle of executing.
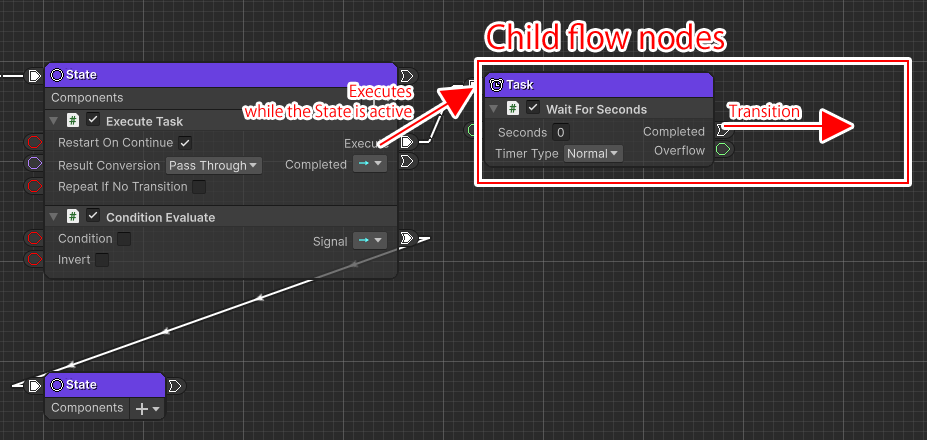
The nodes that an execution wire is connected to (nodes connected by transition wires) are considered to be an execution flow group.
In this case, the connection between the two State nodes is the execution flow group on the parent node, and the connection from Wait For Seconds is the execution flow group on the child node.
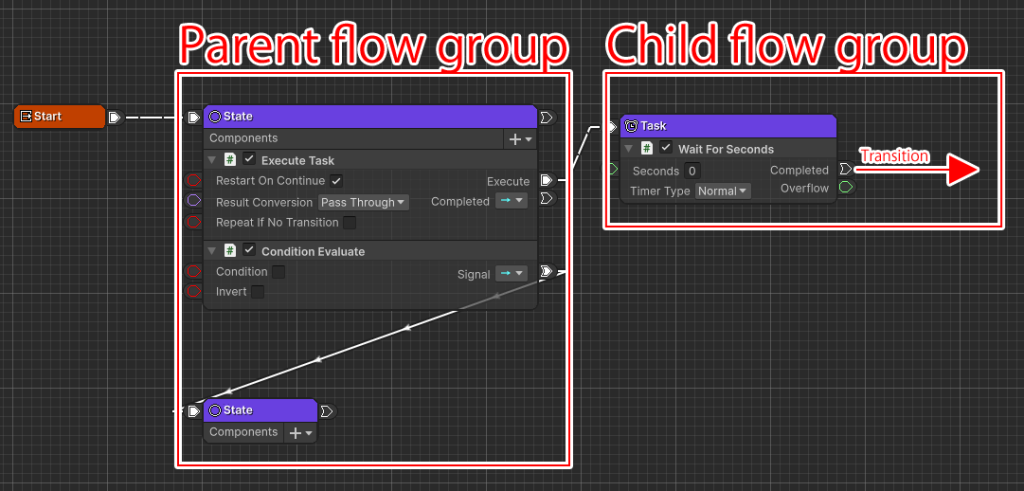
Because the State node and Wait For Seconds are in different groups, if you try connecting the Completed port to an existing State node, the connection to the different group will be disconnected and then reconnected.
If you have tried it as shown in the video, make sure to reconnect Condition Evaluate to State.
For now, just remember that anything beyond the execution wire is executed as a child execution flow group. Groups of different execution flows cannot merge with each other.
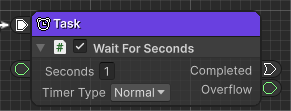
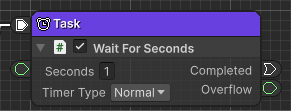
Wait For Seconds setting
Set it to wait 1 second
- Set the Seconds field to
1
Create a Task node for Switch Execute Task
Next, create a Switch Execute Task as the transition destination from Wait For Seconds.
- Drag the Completed port of Wait For Seconds
- Drop it near the right side to open the node creation menu
- Select the Scripts tab
- Select Tasks > Switch Execute Task from the list
- Confirm the node name with the
Enter key
About Switch Execute Task
Switch Execute Task is a type of Execute Task that can switch the execution destination depending on conditions.
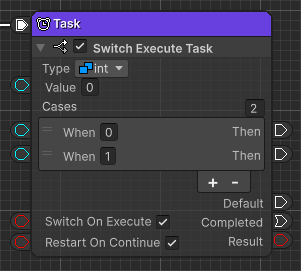
If the Value field matches the When field of each element, the node (child node) connected to the Then port will be executed.
If there is no matching element, the node connected to the Default port will be executed.
If the Switch On Execute field is on, the input value will be evaluated every frame during execution and the destination will be switched.
You can also change the type of the value to be judged, but for now let’s keep it as an int type.
Switch Execute Task setting
Set the Switch Execute Task to switch and execute child nodes.
- Set the number of Cases to
2 - Set the second When field to
1 - Check the Switch On Execute field
Creating a Wait For Seconds Task node
Create child nodes of Switch Execute Task.
- Drag the first Then port of the Cases of Switch Execute Task
- Drop it near the right side to open the node creation menu
- Select the Scripts tab
- Select Tasks > Wait For Seconds from the list
- Confirm the node name with the
Enter key
Wait For Seconds setting
Set it to wait 1 second
- Set the Seconds field to
1
Creating a State node
Create a State node at the transition destination of the Wait For Seconds node you created.
- Drag the Completed port of the Wait For Seconds you just created
- Drop it near the right side to open the node creation menu
- Select the Scripts tab
- Select State from the list
- Confirm the node name with the
Enter key
Duplicate Wait For Seconds and State
Duplicate an existing node to create a second Then port destination.
- Select the Wait For Seconds and State nodes you just created
- Enter
Ctrl C (Win)/⌘ C (Mac)to copy - Enter
Ctrl V (Win)/⌘ V (Mac)near the bottom to paste
Connect the second Then port to the duplicated node
Set the connection destination of the second Then port.
- Drag the second Then port of the Cases of the Switch Execute Task
- Drop it onto the input execute port of the duplicated Wait For Seconds
Create a Task node for If Execute Task
Create a Task node that uses If Execute Task to connect to the Default port.
- Drag the Default port of Switch Execute Task
- Drop it near the bottom of the Wait For Seconds node you just copied and open the node creation menu
- Select the Scripts tab
- Select Tasks > If Execute Task from the list
- Confirm the node name with the
Enter key
About If Execute Task
Like Switch Execute Task, IfExecuteTask can switch the execution destination depending on conditions.
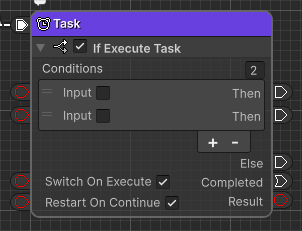
The Boolean values of the Input field are evaluated from the top of the Conditions, and the first Then port that is true is executed.
If no elements satisfy the condition, the node connected to the Else port will be executed.
If the Switch On Execute field is on, the input value will be evaluated every frame during execution, and the destination of execution will be switched.
If Execute Task setting
Set the If Execute Task to switch and execute the child node.
- Set the number of Conditions to
2 - Check the Switch On Execute field
Duplicate Wait For Seconds and State
- Select the Wait For Seconds and State nodes created as child nodes of Switch Execute Task
- Enter
Ctrl C (Win)/⌘ C (Mac)to copy - Enter
Ctrl V (Win)/⌘ V (Mac)near the right side of the Then port of If Execute Task to paste - Paste twice more, arranging them vertically, so that there are three
Connect the If Execute Task to the duplicated node
- Connect the first Then port of the Conditions of the If Execute Task to the input execute port of the first duplicated Wait For Seconds.
- Connect the second Then port to the input execute port of the second duplicated Wait For Seconds.
- Connect the Else port to the input execute port of the third duplicated Wait For Seconds.
Play and check
Once you’ve done this, your graph will look like this:
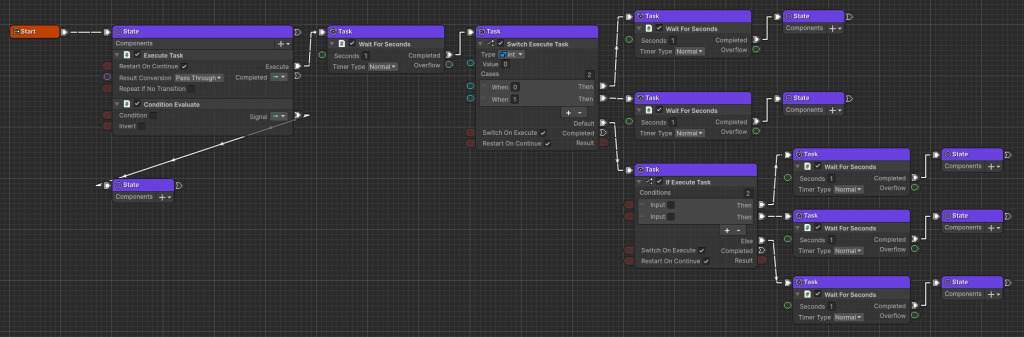
Press the play button to see how it works.
- Confirm that Execute Task executes the first Wait For Seconds and waits for 1 second.
- Switch Execute Task operation check
- Confirm that the node connected to the Then port with the When field set to
0is executed - Confirm that the node connected to the Then port with the When field set to
1is executed when the Value field is changed to1 - Confirm that the node connected to the Default port is executed when the Value field is changed to
2
- Confirm that the node connected to the Then port with the When field set to
- Check if Execute Task works
- Confirm that the node connected to the Else port is executed.
- Confirm that when the first Input field is checked, the node connected to the Then port is executed.
- Confirm that even if the second Input field is checked, the node connected to the Then port is not executed (because the checks are made from top to bottom and only the first port that is true is executed).
- Confirm that when the first Input field is unchecked, the node connected to the second Then port is executed.
- Check the Condition field of Condition Evaluate to ensure that the execution of child nodes is also terminated.
Supplement
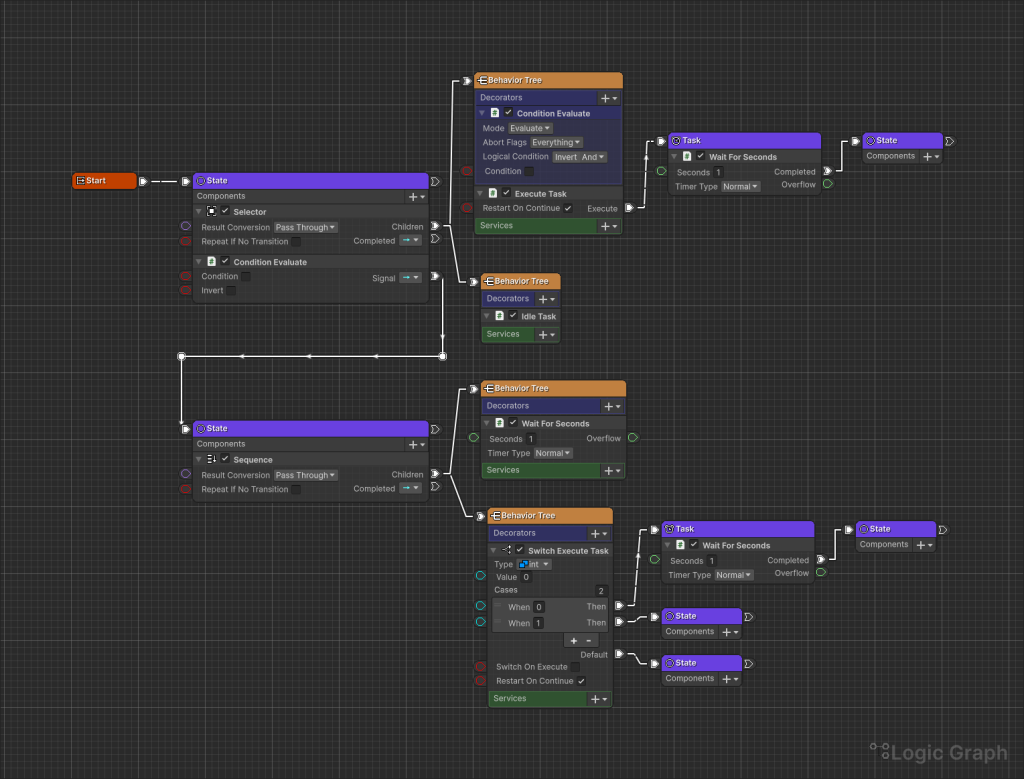
You can also use Execute Task etc. in Behavior Tree nodes.
Execute Task and others are types of TaskComponents, so they can also be used in Behavior Tree nodes.
In other words, by using CompositeComponents such as Behavior Tree Execute on State nodes and TaskComponents such as Execute Task on Behavior Tree nodes, you can organize states and behavior trees into a single graph.
Child node execution result
If you want to pass the results of a child node’s execution flow group to a parent node, you can use the Complete node.
Execution ends the moment the transition to the Complete node is made, and the value of the Result field is received by the parent node, Execute Task, etc.
If Execute Task is a Behavior Tree node, the Result value will be returned as success/failure to the further parent node, Selector, etc.
In addition, the execution result of the TaskComponent used in the State is sent as a signal to the Completed port.
For TaskComponents that may result in failure, use Signal-related nodes to determine the transition.
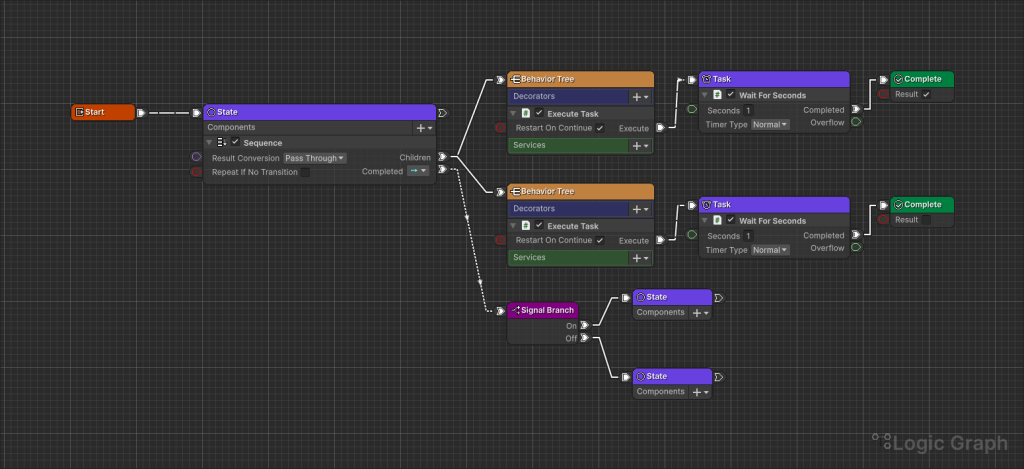
Even if the execution flow is deeply hierarchical, you will only receive the Complete node of the child node group.
Please be careful when passing results if the flow is hierarchical.
Conclusion
This concludes the “Basic Usage” tutorial.
There are also other practical tutorials for creating simple games, so please try them out.
See the list of tutorials here
If you try the trial version and like it, you can purchase it from the Asset Store.