If you haven’t done so already, please complete the previous tutorial, starting with How to create a 3D Roll a Ball game.
Now that we’ve created a clear game, we’ll add obstacles next.
If you touch the Danger Wall (the red wall), you’ll have to start over from the beginning.
The contents to be created are as follows:
- Reload the scene when contact with the
Playeroccurs with OnTriggerEnter. - Use Logic Asset to create behavior and reuse the same behavior.
- Use Logic Player to play the behavior.
Creating a Logic Asset
- Select the Logic folder in the Project window
- Click the + button
- Select Logic Toolkit/Logic Asset from the menu
- Change the name to
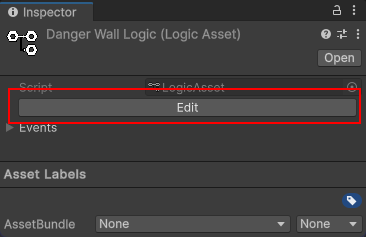
DangerWall Logic - Click the Edit button for Logic Asset to open the Logic Editor window

Editing DangerWall Logic
We will edit the DangerWall Logic in the Logic Editor window.
The method for creating collision detection with the player is the same as for Item Logic.
You can just copy and paste it, but to check how to use the member access script you’ve already created, let’s create the nodes one by one again.
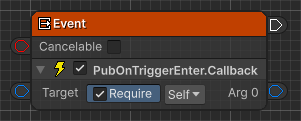
Creating a PubOnTriggerEnter.Callback node
- Click on the graph to focus
- Press the
Spacekey to open the node creation menu - Select the Scripts tab
- Enter
OnTriggerEnter Callbackin the search field - Select PubOnTriggerEnter.Callback (Event) from the list
- Confirm the node name with the
Enterkey
In Item Logic, you selected from the Members tab, but this time we’re selecting from the Scripts tab.
The Members tab allows you to select from all accessible members, while the Scripts tab allows you to select from scripts for nodes that you have already created.
Of course, if you select the same member access in the Members tab, you will use a script you have already created, so it doesn’t matter which one you select.
Use whichever you prefer.
Editing the PubOnTriggerEnter.Callback node
- Check Require in the Target field

Creating a Component.CompareTag node
- Drag and drop the output port of the Arg 0 field of the PubOnCollisionEnter.Callback node to the right side (where you want to create the destination node) and open the node creation menu.
- Select the Scripts tab.
- Enter
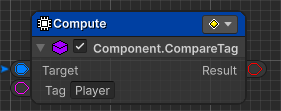
CompareTagin the search field. - Select Component.CompareTag(string tag) (Compute) from the list.
- Confirm the node name with the
Enterkey.
Editing the Component.CompareTag node
- Set the Tag field string to
Player

Creating a Branch Node
- Drag and drop the Component.CompareTag node to the right side of the output port in the Result field (where you want to create the destination node) and open the node creation menu.
- Select the Scripts tab.
- Select Flow Controls/Branch from the list.
Connecting to a Branch node
- Drag and drop the execution port of the PubOnTriggerEnter.Callback node to the input port of the Branch node to connect it.
Creating a SceneManager.LoadScene node
Unlike Item Logic, we create a process to reload the scene when contact is made.
- Drag and drop the True port of the Branch node to the right side (where you want to create the destination node) and open the node creation menu.
- Select the Members tab.
- Enter
LoadScene Namein the search field. - Select
UnityEngine.SceneManagement.SceneManagerLoadScene(string sceneName) from the list. - Select Action from the node type selection menu.
- Confirm the node name with the
Enterkey.
Editing the SceneManager.LoadScene node
- Set the string in the Scene Name field to
RollABall

Ideally, we’d like to get the name of the current scene and set it, but since this would make the explanation too long, we won’t do that this time.
You can get the name of the currently active scene by accessing the SceneManager.GetActiveScene() and Scene.name members, so if you’re interested, give it a try.
Delete the Start node
We won’t be using the Start node that is provided by the beginning, so let’s delete it.
- Select the Start node
- Press the
Deletekey to delete the selected node.
Editing the DangerWall prefab
Open DangerWall in prefab mode
The DangerWall object is created as a prefab.
To edit prefabs reliably, you need to open it in Prefab Mode.
- Double-click Assets/RollABall/Prefabs/DangerWall in the Project window
or select it and click the Open button in the Inspector window.
Add Logic Player
- Select the DangerWall object in the Hierarchy window
- Click the Add Component button in the Inspector window
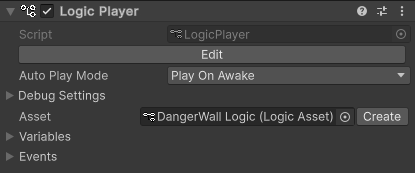
- Select Logic Toolkit/Logic Player from the Component menu
Editing the Logic Player component
- Set DangerWall Logic in the Asset field

Exit Prefab Mode and Save
- Click the < button in the header of the Hierarchy prefab
- A dialog box will appear asking if you want to save it, so click the Save button
DangerWall operation check
Start playing and check how DangerWall works.
- Control the player and confirm that touching the Danger Wall (red wall) will cause the game to start over from the beginning.
- Just to be sure, pick up all the items and confirm that the message “YOU WIN!” is displayed.
Completed
This completes the Logic Toolkit tutorial “How to create a 3D Roll a Ball game”
What you’ll learn
Let’s review what we’ve learned.
- Use the Logic Behavior component to control object behavior
- Use the Logic Asset and Logic Player components to reuse common behaviors
- The member access script generation function allows you to create behaviors without coding
- Use the Event node, Action node, Compute node, and Branch node
- Blackboard variables
Differences from the included sample “Roll A Ball”
There are some differences in the details, so I’ve listed them here.
If you’re interested, take a look and compare them.
- Grouped into group nodes for easy review
- Set the force applied to the player’s movement with a Blackboard variable
- Set to play in the Built-in Render Pipeline regardless of the project’s Render Pipeline
- Assembly name of member access script is
RollABall_GeneratedScripts
Post completion
If you would like to post on social media about the completion of the work up to this point, click here.
